Everything I made the first week with a 3D printer 😎
I knew I would eventually dabble into the world of 3D printing. Well that day came sooner when my brother-in-law surprised my wife & I with an Ender 3!! The literal gift that keeps on giving! I think I spent the first 2 days pouring over Thingiverse just trying to decide what to print first haha. Thankfully, there's a couple test print files to end the analysis paralysis and also ensure the printer is working properly:Already impressed by the quality of this thing! There's a ton of helpful videos for getting started that will cover the basics like free splicer applications (the software you need to open 3D printer files in order to generate the code your printer needs to print the thing), printer profile settings for various filaments and other helpful tips to improve print quality, as well as links to some excellent free files to get you going. There is a learning curve but you will learn something from every print which I find enjoyable. The off-prints can make for a good laugh!
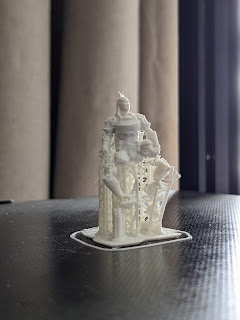
At first I wasn't changing any settings, like print orientation; I'd basically open the .STL file, splice, then print...
This one taught me where the 'Place on face' (of print bed) button is 😂 but was still happy to salvage the model to sit on my desk and serve as a reminder to double check those settings. Before I got all the right settings saved to a custom profile, I kept forgetting to go in and make sure the temperature settings wouldn't drop after the first print layer and would need to then manually override at the printer... But you quickly learn there are a number of ways to do things and you slowly dial everything in over time.
 |
| 32mm Goobertown Brent! |
 |
| 2" x 2" dungeon tiles |
 |
| modular system w/ interlocking clips |
I didn't have the print bed hot enough at first, especially after switching to PLA+ filament, so you'll notice the edges/corners peeling up a bit on the earlier prints. This is definitely something you want to address before doing a massive print, like this Mario question box:
 |
| 27 hours later |
I couldn't believe how big this one turned out. One of the corners was peeling up early on so I wasn't sure it was going to recover, but it did!
My wife was more practical with her first print selections, and went with a bunch of stitch markers for knitting projects:
These turned out incredibly strong despite looking fragile at first, and really highlights one of the best uses for a 3D printer; random household utility projects. Once I saw how industrially strong PLA+ can be, I started downloading files for replacement closet hanging rods, bag mounts for my bikepacking trips... This stuff is so strong if your print bed is big enough you could print little ramps to drive your car up on for oil changes etc. You could print them with filament that contains carbon fiber or other metals for added strength. I can't believe the capabilities of this thing and I've barely scratched the surface.
I'm most excited about what this thing means for my boardgames and terrain projects. These free .stl files of dungeon tiles, walls, doors, etc. perfectly fit the board to our new copy of HeroQuest (my gateway drug to warhammer as a kid).
 |
| official HeroQuest doorframe on left, 3D print on right |
I've already got a whole room printed 😉 The best part is the whole thing is modular with these brilliant click-lock tabs that print in under 5 minutes:
Can't wait to start painting these and working on other projects like 3D Settlers of Catan tiles. Here's the last 2 things we managed to print in our 1st week: this is a riverbed texture terrain roller for imprinting clay or foam, and turned out amazing:
And this is just fun:
So there you have it, our first full week with an Ender 3 v2 3D printer, basically running nonstop haha. We absolutely love it! Thanks Ben for the best gift ever and for setting it up for us so we could just dive into printing!!


.JPG)


No comments:
Post a Comment